
I recently heard a story about a Christmas card returned to its sender after 81 years. That definitely gives new meaning to the phrase “lost in the mail.”
We have better technology to help our mail get to the right place than they did back in 1937, but mail still gets lost, sometimes because of mistakes made by the sender. If you rely on direct mail marketing, those mistakes can result in lost (or returned) mail that’s costly to your effort to get your message out.
Direct mail benefits
Direct mail is an effective way to convey your message to potential customers, voters or users. More than 150 million direct mail pieces are sent each year, and research shows than nearly half of those pieces get scanned or read. That’s why it’s important to correctly design your direct mail piece to avoid extra mailing charges—and to make sure it doesn’t end up “lost in the mail.”
Get the size right
When designing a direct mail piece, start with the right size. Learn the standard sizes to take advantage of the lowest rates from the post office. Odd-shaped or oversized pieces can dramatically raise the price of direct mail.
Postcards – You can get the postcard mailing rate for any mail that’s a minimum of 5 inches long, 3.5 inches tall and 0.007 inches thick, and a maximum of 6 inches long, 4.25 inches tall and 0.016 inches thick. For reference, a notecard is generally 5 inches long, 3 inches tall and 0.007 inches thick.
Letters – To get the letter mailing rate, your direct mail piece doesn’t have to be in an envelope. It can be folded down to fit the letter size or be a single sheet that fits the letter sizes. For letter-size pieces, the minimum size is 5 inches long, 3.5 inches tall, and 0.007 inches thick. The maximum size for letters is 11.5 inches long, 6.125 inches tall and 0.25 inches thick.
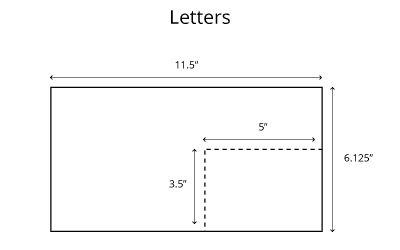
Flats – You can use the flat mailing rate if any one dimension is greater than 11.5 inches long, 6.125 inches tall or 0.25 inches thick. However, flat items can’t be more than 15 inches long, 12 inches tall or 0.75 inches thick.

Choose the right paper
Automated sorting machines don’t like flimsy mail—and postal machines are more likely to leave those pieces, well, in pieces. Avoid delivering a mangled message to your potential customers by knowing the preferred paper type and thickness. Be sure to use book grade paper for all your direct mail pieces.
Postcards – USPS suggests a minimum of 75# paper for postcards.
Letters – Use a minimum 70# paper for items under 1 ounce and 80# paper for items weighing more than 1 ounce.
Flats – The letter standards apply here as well. However, if your direct mail item is bound in any way, the covers should be a minimum 60# paper.
Make the address easy to read
The key to getting your direct mail piece to the recipient is getting the address right. One of the most confusing things when designing direct mail pieces is where to put the address. It differs for each type of mail.
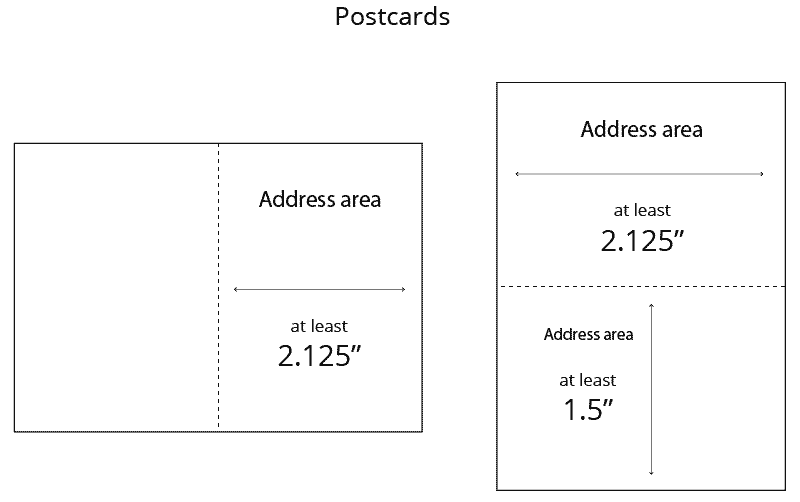
Postcards – Postcards are often divided horizontally or vertically. On a vertically divided postcard, the address area is always on the right, and the address area must be 2 1/8 inches wide. This area will include the address and the postage. In horizontally divided cards, the address area can be on either the top or the bottom. The area containing the address must be at least 1½ inches tall.
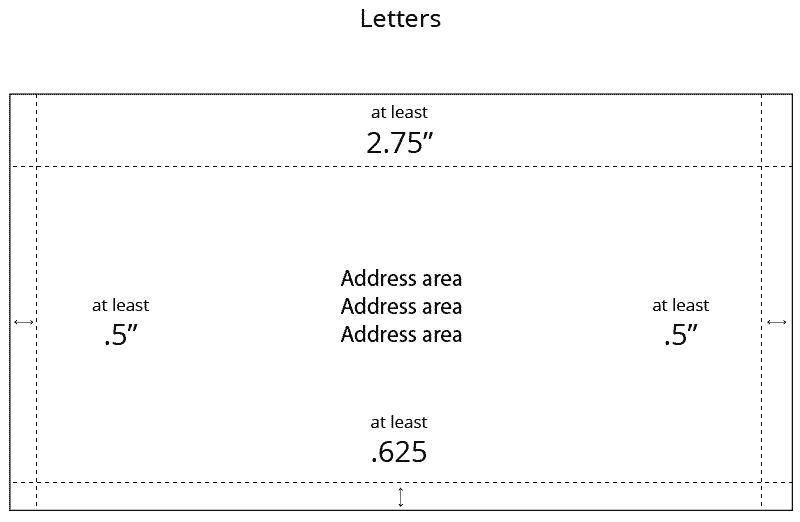
Letters – The address on letters should be placed at least ½ inch from the left edge and ½ inch from the right edge. The top of the address area should be 2¾ inches from the bottom and should end 5/8 inches from the bottom.
Flats – For a flat direct mail piece, the address must be placed in the top half of the mailer. If the mailer is printed so that the long side is horizontal, the right half is considered the top half of the piece. The address must be placed on the same side as the postage.
Addressing the mail piece – Because mail is now sorted by machines, making the address machine-readable is crucial. Follow these tips from the U.S. Postal Service to make sure the sorting machines can correctly read your address labels:
- Use 10-point type.
- Left justify the address.
- Place one space between the city and state but use two spaces between the state and the ZIP code.
- Use black ink on a white background. Avoid white ink on a black background.
- Use all caps for the address.
- Don’t use punctuation.
Seal it up
Single-sheet direct mail pieces don’t require sealing, but if you fold or have a booklet-style piece, the Postal Service requires that they be sealed at the edges to keep them from getting caught in the sorting machines. Wafer seals or tabs are the recommended form of sealing. Avoid using cellophane tape.
Postcards – Postcards can be folded at the top or bottom and sealed with a single tab in the middle of the open side.
Letters – Letters can be folded on the top or bottom but should be sealed with continuous glue, elongated glue lines or 2½-inch tabs.
Flats – Many flats are bound with a spine. This includes any item that’s stapled or glued in the fold. Special sealing rules apply depending on the size of the booklet. Check out the USPS website for details.
Ask for help
Getting all the little things right during the design phase of creating your direct mail piece can save you money and headaches when it comes time to mail them. At Callender Printing, we’ve been printing and mailing direct mail for more than a century, and we’re happy to share our expertise with you. Let us help you avoid extra costs and having your message get “lost in the mail.”
Dan Woehrman is owner of Callender Printing, offering full-service printing capabilities – including letterpress, offset and digital – with union craftsmen quality. As experts in direct mail, the company can help you navigate the often-confusing postal regulations so your piece not only gets there but gets read. Share your thoughts on Facebook or on Twitter @CallenderPrint.
Recent Comments